Superkaramba notebook
| Superkaramba |
|
Sommario |
Il nostro primo tema
Per lo sviluppo del nostro primo tema cominceremo con il preparare alcune immagini, come quella indispensabile dello sfondo.
Poi sarà necessario impostare un carattere di default e le impostazioni generali.
karamba x=1700 y=80 w=330 h=880 locked=true
defaultfont color=255,255,255 fontsize=11 font="Verdana" shadow=1 bgcolor=0,0,0
image x=0 y=0 path="image/bg2.png"
Informazioni generali
Cominciamo a inserire le righe che ci forniranno le impostazioni generali del sistema :
#Information about the computer
<group> x=30 y=10
text x=30 y=20 value="USER:" fontsize=11
text x=95 y=19 sensor=program program="echo ${USER}@`hostname`" fontsize=9
text x=30 y=35 value="KERNEL:" fontsize=11
text x=95 y=35 sensor=program program="uname -r" fontsize=9
text x=30 y=50 value="KDE:" fontsize=11
text x=95 y=50 sensor=program program="kde4-config --version | grep KDE | sed -e 's/.*: //'|cut -c 1-5" line=1 fontsize=9
text x=30 y=65 value="CPU:" fontsize=11
text x=95 y=65 sensor=program program="cat /proc/cpuinfo | grep 'cpu MHz' | sed -e 's/.*: //'| sed -e 's/\..../ MHz attuale/'" interval=10000 fontsize=9
image x=0 y=35 path="image/torre.png"
</group>
Potete provare direttamente i comandi da shell per capire gli output, e se vi pare arabo imparate altrimenti fate come me che copio un pò dai temi che provo e mi piacciono.
Come si può notare in questa parte oltre alle solite informazioni di sistema ho voluto inserire la frequenza di lavoro delle CPU, la quale cambia a seconda della configurazione prescelta dal gestore della cpu frequncy scaling.
La CPU
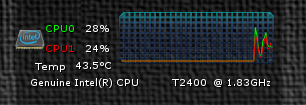
Per la CPU la scelta ricade su un grafico che integra entrambe i processori, oltre alla temperatura e il dato del tipo di processore.
<group> x=30 y=100
#Clock CPU  graph
image x=103 y=10 path="image/griglia.png"
text x=30 y=20 value="CPU0" fontsize=10 color=1,247,1
text x=30 y=40 value="CPU1" fontsize=10 color=237,1,1
text x=20 y=58 value="Temp" fontsize=10
text x=60 y=58 sensor=program program="sensors | grep -o '+[^ ]*C' | head -n 1 | cut -d + -f2"  interval=4000 fontsize=9
text x=70 y=20 sensor=CPU cpu=0 format="%user%" interval=2000 fontsize=10
text x=70 y=40 sensor=CPU cpu=1 format="%user%" interval=2000 fontsize=10
graph x=107 y=10 w=150 h=50 points=100 color=1,247,1 sensor=cpu format="%user" cpu=0 interval=2000
graph x=107 y=10 w=150 h=50 points=100 color=237,1,1 sensor=cpu format="%user" cpu=1 interval=2000
text x=15 y=75 sensor=program program="cat /proc/cpuinfo | grep 'model name' | sed -e 's/.*: //'" line=1 fontsize=9 interval=1200000
image x=0 y=21 path="image/cpui.png"
</group>
Nel caso vi siano più CPU è possibile inserire i valori in grafici diversi oppure in un grafico solo come nell'esempio, alla fine resta una questione di spazio.
Hard Disk e Memoria
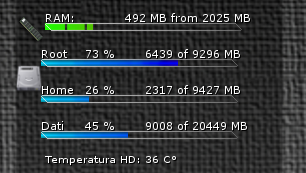
In questo spazio vi è inserito l'uso della memoria accompagnato dallo spazzio usato nelle partizioni dell'unico HD.
In aggiunta la temperatura dell'HD.
<group> x=30 y=210
#RAM
text x=30 y=0 value="RAM:"
text x=110 y=0 sensor=memory format="%umb MB from %tm MB" interval=3000
bar  x=30  y=13 path="image/barra3.png" sensor=memory format="%umb" interval=8000
image x=29  y=12 path="image/barrab.png"
image x=0 y=3 path="image/ddr1.png"

#root drive
text x=26 y=36 value="Root"
text x=70 y=36 sensor=disk format="%up %" mountpoint="/" interval=3000
bar  x=26 y=49 path="image/barra4.png" sensor=disk mountpoint="/" interval=8000
image x=25  y=48 path="image/barrab.png"
text x=130 y=36 sensor=disk format="%u of %t MB" mountpoint="/" interval=8000
image x=0 y=55 path="image/disco.png"

#home drive
text x=26 y=72 value="Home"
text x=70 y=72 sensor=disk format="%up %" mountpoint="/home" interval=3000
bar  x=26  y=85 path="image/barra4.png" sensor=disk mountpoint="/home" interval=8000
image x=25  y=84 path="image/barrab.png"
text x=130 y=72 sensor=disk format="%u of %t MB" mountpoint="/home" interval=8000

#dati drive
text x=26 y=108 value="Dati"
text x=70 y=108 sensor=disk format="%up %" mountpoint="/mnt/dati" interval=8000
bar  x=26  y=121 path="image/barra4.png" sensor=disk mountpoint="/mnt/dati" interval=10000
image x=25  y=120 path="image/barrab.png"
text x=130 y=108 sensor=disk format="%u of %t MB" mountpoint="/mnt/dati" interval=8000

#hddtemp
text x=30 y=142 value="Temperatura HD:" fontsize=10
text x=130 y=142 sensor=program program="hddtemp -n /dev/sda" interval=5000 fontsize=10
text x=140 y=142 value="  C°" fontsize=10
</group>
In questa parte lascio spazio alla RAM occupata realmente e allo spazio utilizzato sui dischi.
Per poter utilizzare hddtemp come utente occorre che sia stato configurato per l'uso anche da parte dell'utente.
La Rete
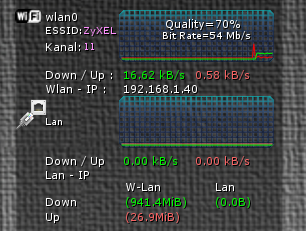
Per la rete dato che siamo su un dispositivo portatile, ho voluto integrare un rapporto di tutte le periferiche che uso.
A seconda del tipo di connessione verranno aggiornati solamente i campi interessati.
<group> x=30 y=50
#wlan0 speed
image x=103 y=330 path="image/griglia.png"
image x=0 y=330 path="image/wifi_icon.png"
text x=30 y=330 value="wlan0"
text x=30 y=345 value="ESSID:" fontsize=9
text x=68 y=345 sensor=program program="/sbin/iwgetid | cut -d ':' -f2|cut -c 2-6" color=255,144,255 fontsize=9  font="Verdana" interval=10000
text x=30 y=360 value="Kanal:"
text x=68 y=362 sensor=program program="/sbin/iwgetid --channel --raw" color=255,144,255 fontsize=9 font="Veranda" interval=10000
text x=150 y=337 value="Quality="
text x=200 y=337 sensor=program program="cat /proc/net/wireless | grep wlan0 | awk '{print $3}'|cut -c 1-2" interval=10000
text x=214 y=337 value="%"
text x=117 y=350 sensor=program program="/sbin/iwconfig wlan0 | grep 'Bit Rate' | cut -d 'T' -f1" color=255,255,255 fontsize=9  font="Verdana" interval=10000
text x=30 y=388 value="Down / Up :"
text x=108 y=388 sensor=network device="wlan0" format="%in kB/s"  decimals=2 color=1,247,1
text x=180 y=388 sensor=network device="wlan0" format="%out kB/s" decimals=2 color=247,100,100
text x=30 y=402 value="Wlan - IP :"
text x=108 y=402 sensor=program program="/sbin/ifconfig wlan0 | grep 'inet ' | cut -d : -f2 | cut -d ' ' -f1" interval=1200000
#wlan0 speed graph
graph x=107 y=339 w=150 h=40 color=247,1,1 points=100 sensor=network format="%out" device="wlan0" max=45 interval=2000
graph x=107 y=330 w=150 h=50 color=1,247,1 points=100 sensor=network format="%in" device="wlan0" max=150 interval=2000
#eth0 speed
image x=103 y=416 path="image/griglia.png"
image x=0 y=420 path="image/net3.png"
text x=30 y=436 value="Lan" fontsize=9
text x=30 y=474 value="Down / Up"
text x=108 y=474 sensor=network device="eth0" format="%in kB/s" interval=2000 decimals=2 color=1,247,1
text x=180 y=474 sensor=network device="eth0" format="%out kB/s" interval=2000 decimals=2 color=247,100,100
text x=30 y=488 value="Lan - IP"
text x=108 y=488 sensor=program program="/sbin/ifconfig eth0 | grep 'inet ' | cut -d : -f2 | cut -d ' ' -f1" interval=5000
#eth0 speed graph
graph x=107 y=425 w=150 h=40 color=247,100,100 points=100 sensor=network format="%out" device="eth0" max=45
graph x=107 y=416 w=150 h=50 color=1,247,1 points=100 sensor=network format="%in" device="eth0" max=140
text  x=30 y=515 value="Down"
text  x=30 y=530 value="Up"
text  x=110 y=500 value="W-Lan"
text  x=200 y=500 value="Lan"
text x=110 y=515 color=1,247,1 sensor=program program="/sbin/ifconfig wlan0 | grep 'RX byte' | awk '{print $3 $4}'" interval=8000
text x=110 y=530 color=247,100,100 sensor=program program="/sbin/ifconfig wlan0  | grep 'RX byte' | awk '{print $7 $8}'" interval=8000
text x=200 y=515 color=1,247,1 sensor=program program="/sbin/ifconfig eth0 | grep 'RX byte' | awk '{print $3 $4}'" interval=8000
text x=200 y=530 color=247,100,100 sensor=program program="/sbin/ifconfig eth0 | grep 'RX byte' | awk '{print $7 $8}'" interval=8000
</group>
Per la rete di un PC portatile ho preferito avere a disposizione entrambe le possibili configurazioni, che nel mio caso sono wlan0 e eth0.
I Processi
#
<group> x=60 y=610
    text x=1 y=0  sensor=program program="ps axo comm,user,pcpu --sort=-pcpu | head -n 10" font
size=11 font=monospace interval=2000
    </group>
L' alimentazione
L'alimentazione è stata inserita perchè quella visualizzata da KDE4 mi piaceva poco.
Dallo status è possibile verificare se è charging, discharging o full, mentre l'immagine si aggiorna sullo stato di carica.
<group> x=15 y=760
text x=25 y=-5 value="Battery Status:" fontsize=11
text x=120 y=-5 fontsize=11 sensor=program program="cat /sys/class/power_supply/BAT0/status" font
size=11 interval=10000
text x=25 y=15 value="Charge :" fontsize=11
text x=80 y=15 sensor=program program="acpi | awk '{print $4}' | sed 's/,//'" interval=10000 fontsize=11
image x=120 y=-2 path="image/battery2.png"
bar x=153 y=10 w=48 h=18 path="image/battery-bar.png" sensor=program program="acpi | awk '{print $4}' | grep -o '[0-9]*'", "r"" interval=10000
</group>
Risultato
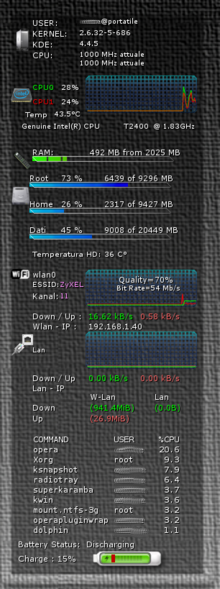
Questo è il risultato finale che riporta le modifiche eseguite al tema xxx che è stato preso come riferimento.
Note
Il seguente tema è derivato dalle modifiche personali poste al tema: | 66854-Laptop-Wifi-Theme-1.0
La versione originale del tema andava bene per KDE3, poi qualcosa è cambiato ed è stato adattato alle mie esigenze per KDE4 .

